Gentlemen, it’s that time of the year again. It’s Valentine’s Day, a day to tell your wife, your fiancé, your girl that you love her – and figure out some clever, special way to do it. Well, not all of us plan ahead, and I know a cool trick up your sleeve can save your butt if you are scrambling to figure something out the day before or even the day of Valentine’s Day. So here’s a treat for you all. I am going to explain a way to make an origami rose in 5 minutes or less that you can give with your V-Day card. Any schmuck can buy a rose. But to make a rose, to show that you spent time to create an item of love and devotion – that’s gonna impress any girl. And consider this for any Dads out there with boys in school – this is a cool little trick that you can show to your boy so that he can make a rose for his special sweetheart.
First, let me show you the end product so you know what you’re trying to create. This is the end product, the rose you’re trying to make.
First, you’re going to need to tissue paper. In fact, I learned this trick when I was making origami roses of a different sort some time ago and found a book that talked about how to make flowers with napkins. I found that napkin papers are good to practice with, but the final product you’ll need tissue paper of the appropriate color. For this project, you’ll need red tissue paper. It can be of the type that’s used to stuff gift boxes or bags, and can be found in any crafts store (like Michaels, or Target).
To make this rose, You’ll need red tissue paper and green tape. Additional green tissue paper is optional.
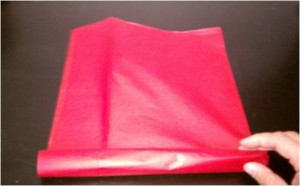
Take the red tissue paper, and lay it flat. Fold it in half so that it’s essentially “two-ply” – if not, then the tissue paper will be too weak to survive what needs to be done in the subsequent steps.
Next, start to roll it up. It doesn’t have to be too tight, because in the next steps you’re actually going to loosen up the roll. However, it’s important to NOT fold the paper. You want to maintain the curve of the tissue paper without putting additional folds into it. If you want, you can use a pen or pencil to help maintain the curve and not fold it, but I found that after a while you can just do this with your fingers. Practice this part – it’s important.
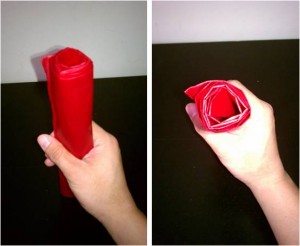
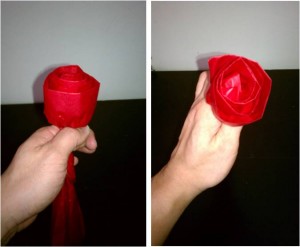
When you’ve finished the roll up, you’ll see that you now have a tube of tissue paper that spirals inward, like you see in the pictures below. Hold onto this roll – don’t let it unfurl completely. While holding onto this roll, loosen your grip a little bit and allow unfurl in a controlled way. This will allow the inner rolls of the tissue paper to be manipulated without you stretching and tearing the paper later.
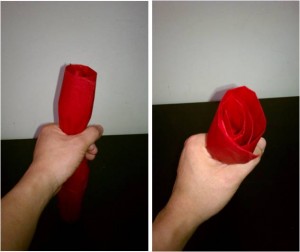
Now, grip up to about where you think the petals of the rose should meet the stem, and pinch the tissue paper. That is, tighten your grip at about the point on the roll and the paper will naturally pinch in. You can see what happens in the pictures below. As you slowly pinch the paper, make sure the upper section where the petals would be remain loose. If need be, manually loosen up the roll in that section as you pinch the remaining section of the roll.
Completely pinch the paper and you will see that the upper petal section naturally forming an uneven layering. Allow this to happen – you want this effect to get a natural looking rose.
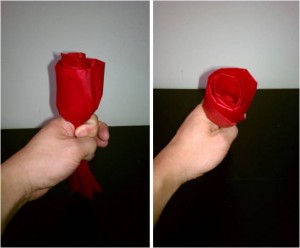
As you completely pinch down at the stem region, continue to loosen the upper petal section. Keeping this balance going – pinching the stem area and loosening up the petal area – this is where the “art” and practice part will come in. You may need to practice this a couple of times, so I’d recommend going slowly.
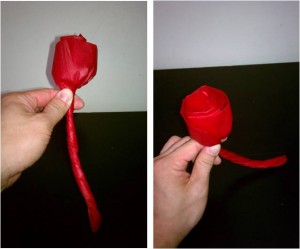
Now your petals are ready. Complete the stem by twisting the roll of tissue paper below the petals into a tight spiral. The tighter the better.
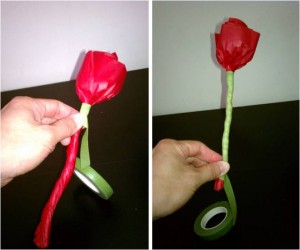
When the tissue paper has been tightly wound, get the green tape and start to tape around the now newly formed stem. I recommend starting at the top, right where the petals meet the stem, and working your way down, in a spiral, so as to completely cover the red paper where the stem is. Also, another tip is to wind the tape down in the same direction as the twisting of the paper was done when you twisted the paper to form the stem.
And when you’re done, you cut and close up the green tape at the bottom, and you’re left with a red rose with a green stem.
Feel free to make as many as you need – this entire process takes about 4-6 minutes once you’ve gotten used to it. The most tricky part is the pinching of the stem and loosening of the roll where the petals are. But the good news is that if you go slow – that is, if you don’t pinch down completely immediately, then you actually have a lot of opportunities to redo the rose petals – this is the hardest part of the entire process.
Alright fellas. Good luck, Happy Valentine’s Day, and go have fun with your special girl.



Sorry, the comment form is closed at this time.